FL STUDIO SETUP
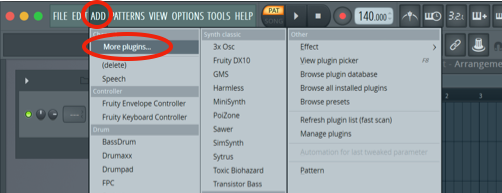
In FL Studio you simply load Melody Sauce as a VST plugin onto its own MIDI channel. Insert Melody Sauce VST onto a new channel by clicking on “ADD” and “More plugins…”.
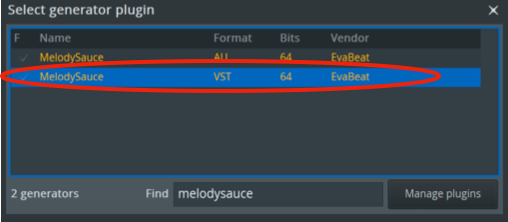
NB: be sure to use the VST version, and not the AU/Audio Unit:
Search for Melody Sauce and double-click on the VST plugin.
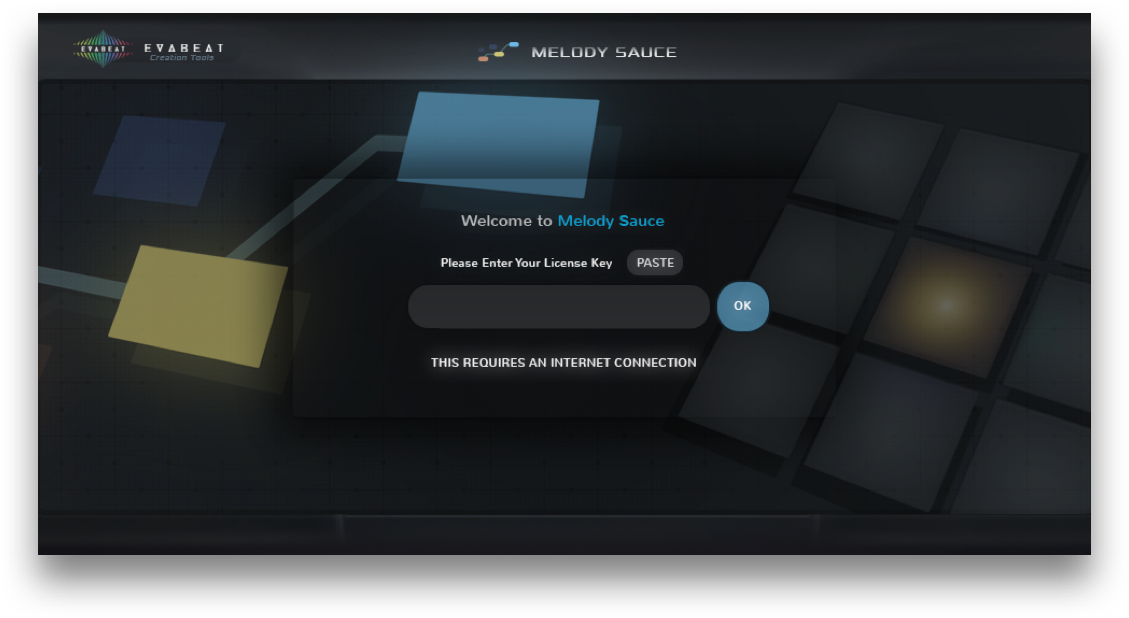
The authorisation window will appear. Enter your license/serial key to authorise Melody Sauce (this requires an internet connection). See Authorisation Guide for more details.

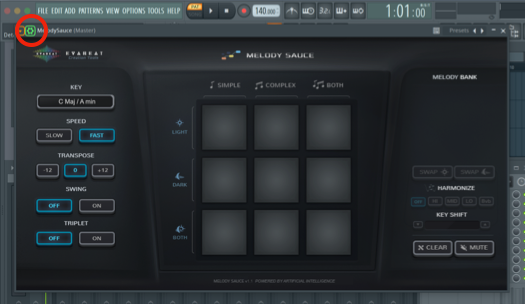
Once authorised, the Melody Sauce 2 interface should appear and the plugin is ready for use!
Set Pattern Length in Channel rack to 32 beats or more
NB: MIDI ROUTING SETUP
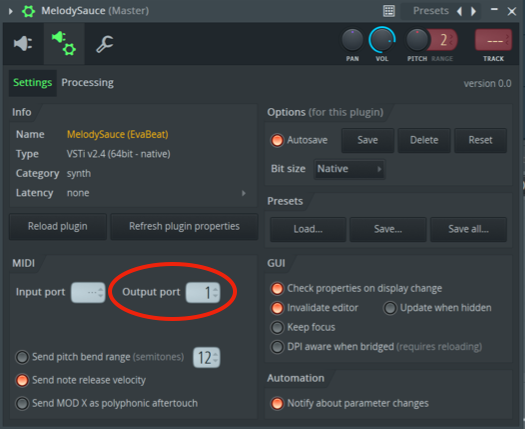
If you don't want to use Melody Sauce's internal sounds you can send Melody Sauce's midi to another software instrument. Open Melody Sauce’s interface panel and click on the Detailed Settings icon:
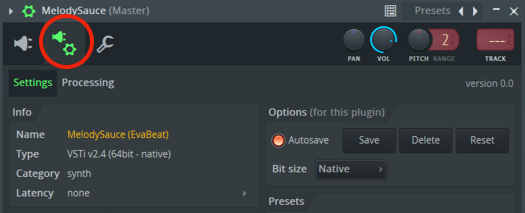
Set the MIDI “Output port” to a specific port e.g. Output port number “1”
On a second channel loaded with one of your favourite software instruments, set the MIDI “Input port” to the same port as you selected above (e.g. in this example set the Input port to port “1”):

Make sure your project is playing and we recommend looping playback for at least 8 bars (32 beats) so you can hear the whole melody. You can set your Pattern Length in Channel rack to 32 beats or more:
You are now ready to start generating melodies!
Please see our Support Guide
Native FL Studio synths (MiniHost etc):
1. Open a Patcher channel
2. Add Melody Sauce (right-click “Add plugin”)
3. Add your native FL Studio synth (eg: MiniHost)
4. Go to the Detailed Settings gear tab on Melody Sauce, and select a port (any) for the MIDI “Output Port”
5. Make sure they are all linked as follows:
- From FL Studio green MIDI output to Melody Sauce
- From Melody Sauce green MIDI output to MiniSynth
- From MiniSynth yellow audio output to FL Studio
ABLETON LIVE SETUP
In Live you simply load Melody Sauce as a VST plugin onto its own MIDI track, and then route the outgoing MIDI from this track to another software instrument track.
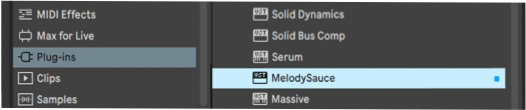
On a MIDI track select the Melody Sauce VST from the VST plugins in the track’s main browser:
The authorisation window will appear. Enter your license/serial key to authorise Melody Sauce (this requires an internet connection). See Authorisation Guide for more details.
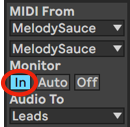
On a second Instrument Track loaded with one of your favourite software instruments, find the “MIDI From” dropdown menu (click the “I-O” button if this isn’t displayed). Change both “All Ins” and then also “Post FX” (immediately below) options in the two boxes to “Melody Sauce”:

Finally click the arm button to arm the track:

Make sure your project is playing and we recommend looping playback for at least 8 bars so you can hear the whole melody.
You are now ready to start generating melodies!
Multiple Tracks:
If you want route Melody Sauce’s MIDI output to multiple instrument tracks at the same time, change the MIDI Monitor setting on the receiving instrument tracks from “Auto” to “In”.
You will need to set this back to “Auto” when you no longer want the instrument tracks to receive MIDI from Melody Sauce and instead receive MIDI from MIDI clips within your DAW.
LOGIC PRO SETUP
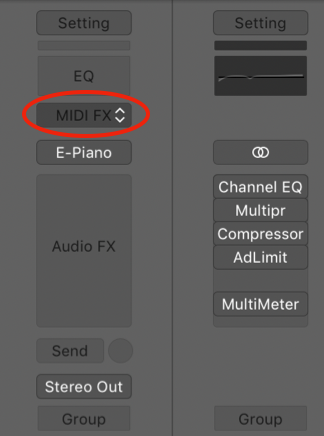
In Logic Melody Sauce can be loaded as a MIDI FX. This allows both Melody Sauce and the software instrument it’s controlling to sit on the same track.
On an Instrument Track loaded with one of your favourite software instruments, select Melody Sauce in the MIDI FX slot.
The authorisation window will appear. Enter your license/ serial key to authorise Melody Sauce (this requires an internet connection). See Authorisation Guide for more details.
Make sure your project is playing and we recommend looping playback for at least 8 bars so you can hear the whole melody.
You are now ready to start generating melodies!
CUBASE SETUP
In Cubase, all you need to do is load Melody Sauce as a VST plugin onto its own MIDI track, and then route the outgoing MIDI to another software instrument track.
Add an Instrument Track:

Then load Melody Sauce as a VST Instrument:

The authorisation window will appear. Enter your license/serial key to authorise Melody Sauce (this requires an internet connection). See Authorisation Guide for more details.
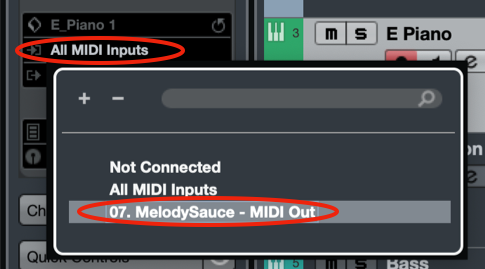
On a second Instrument Track loaded with one of your favourite software instruments, change the the MIDI input from “All MIDI Inputs” to “Melody Sauce - MIDI Out”:
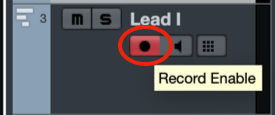
Finally click “record enable” to arm the receiving instrument track:
Whilst continuing to highlight this receiving instrument track, click on Melody Sauce’s Edit Instrument window to open the plugin’s interface panel. You need to have the receiving instrument track highlighted for the output to be activated:

Make sure your project is playing and we recommend looping playback for at least 8 bars so you can hear the whole melody.
You are now ready to start generating melodies!
In Cubase it’s also helpful to set the transport bar to “Return to Start Position on Stop” so that you can set playback and Melody Sauce to begin on the first beat of a bar.
STUDIO ONE SETUP
In Studio One you simply load Melody Sauce as a VST plugin onto its own MIDI channel, and then route the outgoing MIDI from this channel to another channel with your chosen software instrument track.
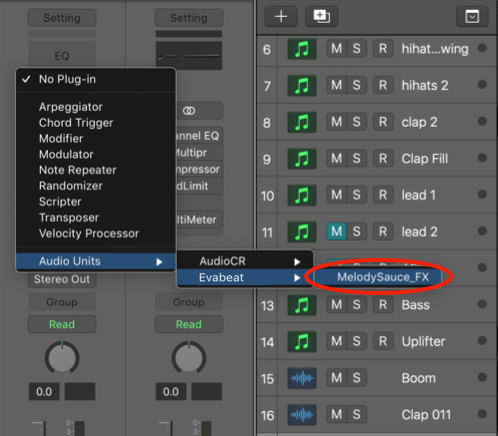
In Studio One insert Melody Sauce VST from your Instruments (located in an EvaBeat folder) onto a new MIDI Instrument Track:

The authorisation window will appear. Enter your license/serial key to authorise Melody Sauce (this requires an internet connection). See Authorisation Guide for more details.
On a second Instrument Track loaded with one of your favourite software instruments, simply change the MIDI input from “All Inputs” to “Melody Sauce”:
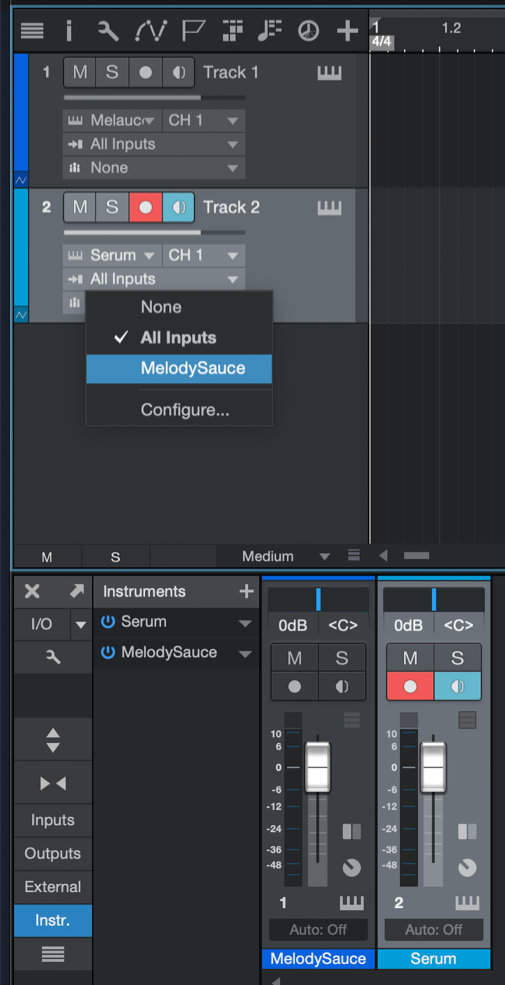
Then finally make sure the track is armed.
Make sure your project is playing and we recommend looping playback for at least 8 bars so you can hear the whole melody.
You are now ready to start generating melodies!
REAPER SET UP
In Reaper you simply load Melody Sauce as a VST plugin onto its own MIDI track, and then route the outgoing MIDI from this track to another software instrument track.
On a MIDI track select the Melody Sauce VST to its own track.
The authorisation window will appear. Enter your license/serial key to authorise Melody Sauce (this requires an internet connection). See Authorisation Guide for more details.
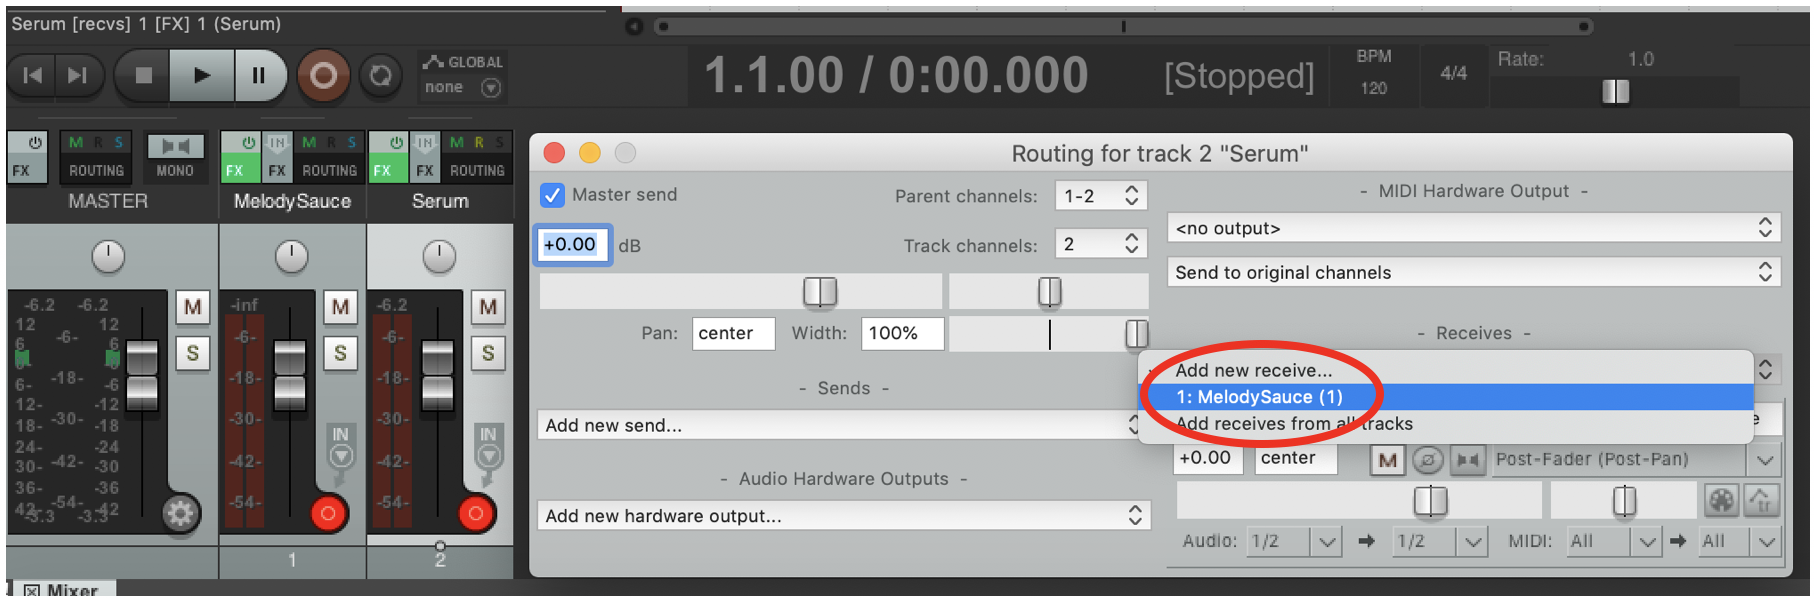
On a second Instrument Track loaded with one of your favourite software instruments, click “Route”, click on “add new receive" and select “Melody Sauce”:
Make sure your project is playing and we recommend looping playback for at least 8 bars so you can hear the whole melody.
You are now ready to start generating melodies!
ROSETTA M1 MAC SET UP
Apple M1 Mac compatibility: Melody Sauce is compatible with M1 machines under Rosetta, we recommend using Rosetta for better stability. Below is a guide on how to start Logic using Rosetta.
On Apple M1 machines, you can run Logic Pro using Rosetta to run the x86 version of your plugins.
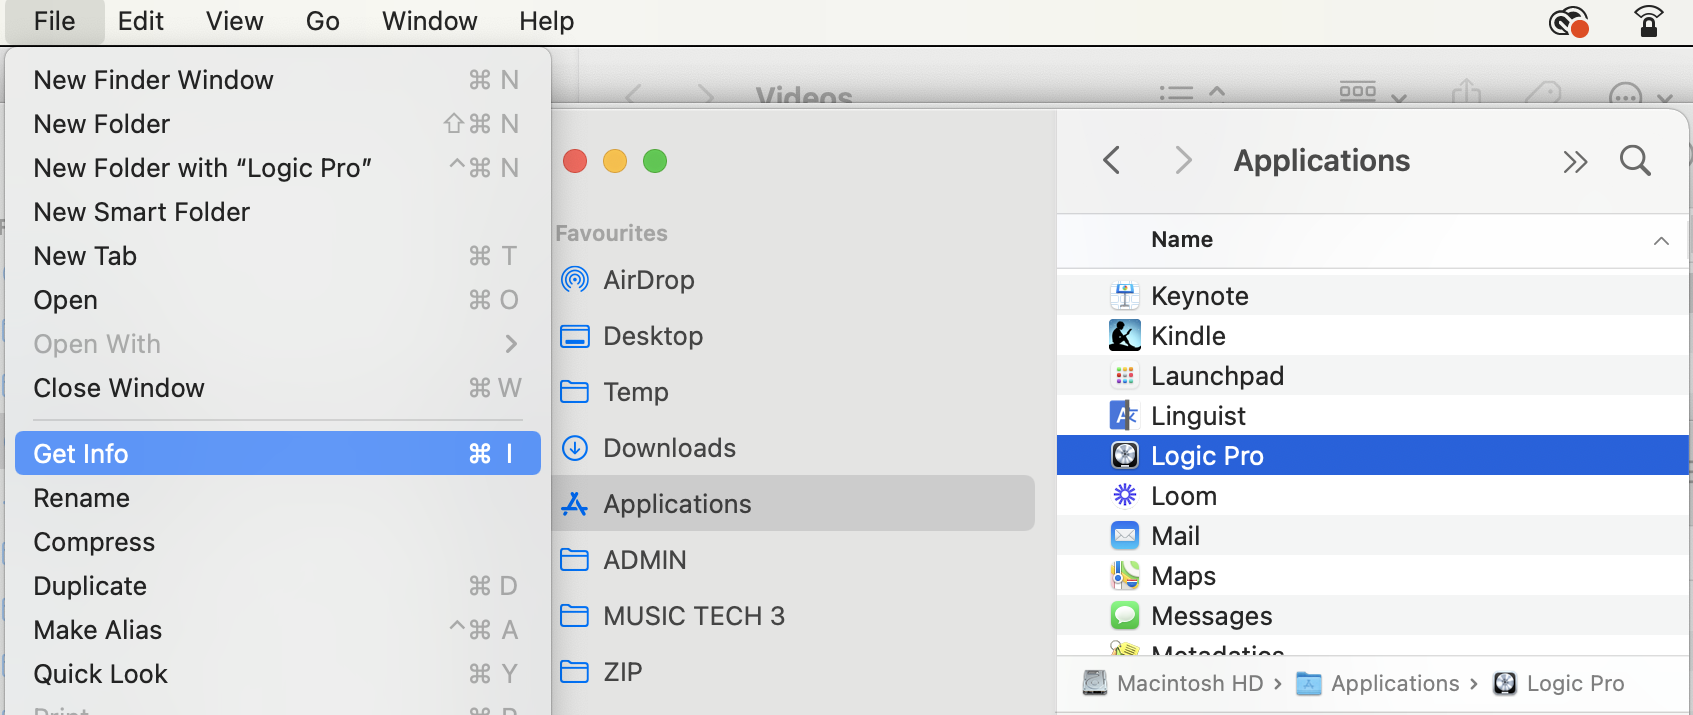
Open the Finder and go to your Applications folder
Right-Click on the Logic Pro icon
Click on “Get Info”
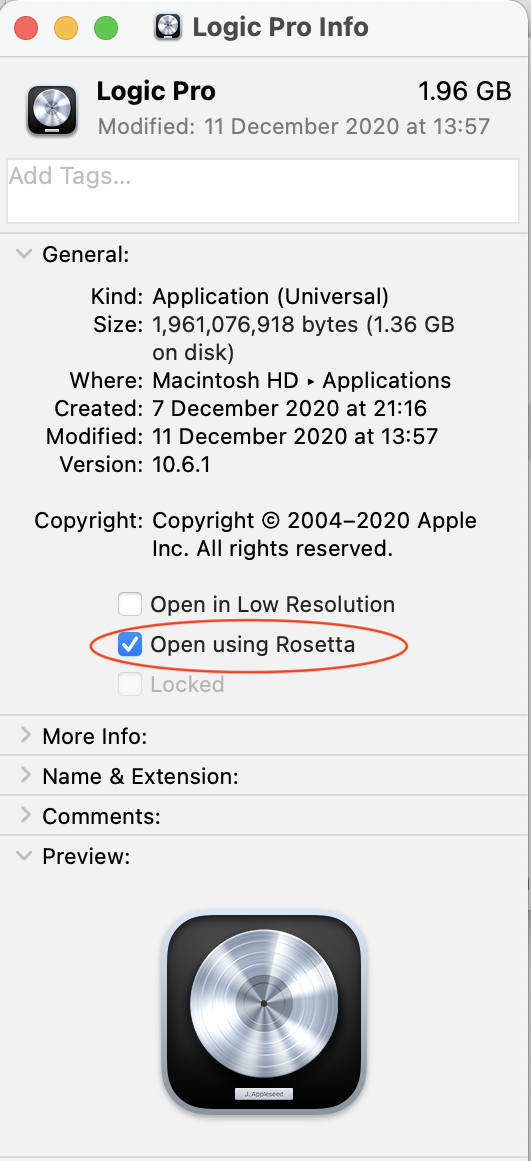
Tick “Open using Rosetta”
Restart Logic Pro
Stay up to date with all things Evabeat with our mailing list
Thank you! Your submission has been received!
Secure payment by

Created with love by evabeat